BDE Installation Instructions

Welcome to the Installation instructions for the BigFix Development Environment (BDE). Once certified, this step-by-step guide will have you creating Fixlet messages in minutes.

Note: BDE downloads are no longer available. Please contact BigFix Support for more assistance.

Requirements

  • BDE Server: Win2000/WinXP/Windows Server 2003 1.0 GHZ+, 256 MB RAM+, SQL Server (or MSDE), IIS
  • BDE Console: Win2000/WinXP 1.0 GHZ+, 256 MB RAM+
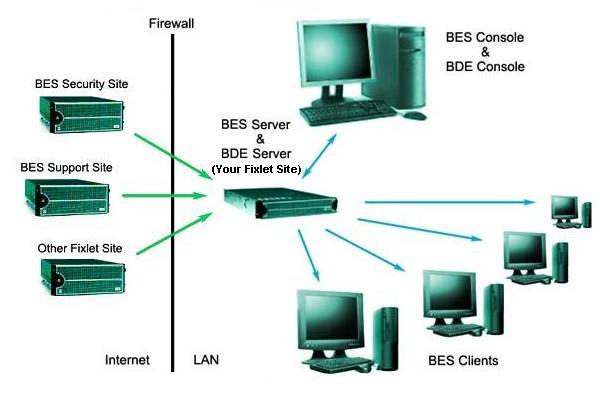
Diagram of a Standard BigFix Development Deployment:

The BDE Console is used to create Fixlet messages which are then routed by BigFix throughout the LAN.

Getting Certified

(Do you already have a certificate from BigFix to use BDE? If so, go here)
  1. Download the BDE Authorize tool. Contact BigFix, Inc. or download the BDE Authorization Tool from BigFix at http://support.bigfix.com/bde/install/downloadbde.html. Use the Open command to directly install the software. Remember where you save BDEAuthorize.exe. When the installation completes, make sure the Launch box is checked and click Finish.

  2. Create a request to operate a Fixlet® site. You need to supply some information about your site to BigFix, Inc. in order to authorize you as a Fixlet developer:

    • Select the radio button marked Create a request to operate a Fixlet site, and click Next. The Create A Request screen will be displayed.
    • Enter your desired site name and the URL that points to it. (Important Note: The example site gather url in BDE Authorize shows "http://myserver/cgi-bin/bfgather/sitename", which is a Unix style web address. Since you are installing on a Windows computer, you will need to use a site gather url in the form of "http://myserver/cgi-bin/bfgather.exe/sitename.) Select the Enterprise button. Click Next.
    • Enter your name, email address and other company information. The country code for the United States is US. For more country codes, check this ISO web page. Click Next.
    • The program now has enough information to create your private key and a license request based on your public key. After BigFix signs your public key, it will send you a certified site license. Find or create a folder to save this certificate, then give it a password. Jot this info down and store it in a secure place.
    • Finish up by submitting your application to BigFix, Inc.

  3. Wait for a response from BigFix. This typically takes less than 24 hours. When you receive your license, continue the instructions from here.

Activating Your Site

  1. Open BDE Authorize. After you receive your certificate file from BigFix, run BDE Authorize again (from Start > Programs > BigFix Development > BDE Authorize) and choose Activate your site by importing a site certificate.

  2. Activate your masthead. Choose the certificate file, license.crt, that was signed and sent to you from BigFix, Inc.
    Note: Certain versions of Microsoft Outlook will not allow attachments that end in .crt. In order to avoid this problem, BigFix will send back a file called license.zip that contains the license.crt file. This file can be extracted by WinZip or any other zip program and saved to your hard drive.


  3. Create your masthead parameters. Type in a subject name for your Fixlet site and specify the client gather interval (how frequently you want your site to be updated). Select a 32x32 pixel site icon in bmp format (the site icon is optional and can be added later) to represent your site, and enter a description that describes the Fixlet site. Click Next.

  4. Save your masthead. Choose a name for your masthead and save it with the default extension (for an enterprise site, this is .efxm) Make a note of its location. Click Next.

  5. Authorize your Fixlet publishers. Enter the names of each person you wish to grant publishing rights to, including yourself (note that publisher rights are not required to create Fixlet messages, only to publish them to the server). Each person requires a separate password, so be sure to write down the names and passwords in a secure place. Each publisher credential should be saved to an empty folder (for additional security, save the publisher credentials on a removable disk). You will need to deliver the publisher credential files, along with the password, to the designated BDE publisher. During the creation of the publisher credentials, you will need to authenticate each publisher with your site password. When all of your publishers have been entered, click Finish.

Installing the BDE Server

These instructions describe the default installation where all the BDE components will be installed on the same computer. For details on separating the BDE components to different computers, please contact your support technician.
  1. Run the BDE Server installer. (Note that the BDE Server can be installed on the same computer as the BigFix Server.)

  2. Choose the components to install. Accept the default set of components and click Next.

  3. Browse to your masthead. When prompted prompted for the setup type, select the button indicating that you already have a masthead and click Next. Browse to your masthead location and select it. Click Next.

  4. Save the files. Tell the installer where to place the program files (typically in the default folder at "C:\Program Files\BigFix Development\BDE Server"). Click Next.

  5. Create your database users. Add users to the list, providing a password for each one. These can be the same set of users that you authorized as publishers above, but the publisher credentials are not required for creating Fixlet message (the publisher credentials are required to send the Fixlet messages to the BigFix Server computers or clients that gather from your Fixlet site). Make sure you write down the list of users and passwords in a safe place. Click Finish. Grant the approval level as appropriate to each publisher depending on their Fixlet authoring roles. Approval level 5 is the highest level and should be reserved only for those users who have publishing keys.
  6. Note: Follow the rest of these instructions only if you are installing the BDE Server on Windows XP or Windows Server 2003. If you installed the BDE Server on a Windows 2000 machine, your BDE Server installation is complete at this point, skip to the next section.

  7. Modify file permissions for the Internet Guest User account (IUSR_COMPUTERNAME):
    1. Browse to cmd.exe (C:\Windows\System32\cmd.exe)
    2. right-click and choose "Properties"
    3. go to the "Security" tab
    4. Make sure the IUSR account has both "Read" and "Read & Execute" permissions on this file. Note: Windows will display a security warning when you set these permissions
    5. click YES to confirm the change.

  8. Modify folder permissions for the Internet Guest User account (IUSR_COMPUTERNAME):
    1. Browse to the "BFConfig" folder (C:\Program Files\BigFix Development\BDE Server\BigFixServer\BFConfig)
    2. right-click and choose "Properties"
    3. go to the "Security" tab
    4. Make sure the IUSR account has both "Modify" and "Write" permissions on this folder.

  9. Update the Web Service Extensions
    1. Open the "Internet Information Services (IIS) Manager" (available through "Administrative Tools")
    2. Right-click on the local computer and go to "Properties"
    3. Click the "MIME Types..." button, and add a new MIME Type with the extension ".*" and type "application/octet-stream"
    4. Expand the local computer within the IIS Manager
    5. go to the "Web Service Extensions" folder
    6. Make sure "All Unknown CGI Extensions" is "Allowed". Note: Windows will display a security warning when you change this setting
    7. click YES to confirm the change.

Installing the BDE Console

  1. Run the BDE Console installer. You can find it at the BigFix web page at http://support.bigfix.com/bde/install/downloadbde.html.
  2. Choose "typical." Find a place to save the files and click on the button for a typical installation.
  3. Select Yes when prompted to create the ODBC driver. Select the database with the BDE Server. Check the box to launch the BDE Console and click Finish.

Setting Up Your Site

  1. Run the BDE Console, if not already running. Enter your username and site-level password.

  2. Create a new site from Tools/New Site. Give it a name and click OK. The site will show up in the left panel, populated with default folders for graphics, templates and other files.

  3. Run BDE Admin (you don't need to quit BDE). Click the button marked "Select Database." Select the proper database, enter your admin database name and password, as created above. The screen will fill with information about your database.

  4. Select the Sites tab. Your sites should appear in a list. Select your new site and click the Edit button. This is the (new and blank) propagation profile for this site.

  5. Click the New button to create your propagation profile. There are three parts to this profile:
    • The masthead site name. This is the masthead you created above (e.g. masthead.efxm).
    • The propagation URL points to a program which was installed by the BDE Server component in your wwwroot folder. It typically looks something like http://www.acme.com/cgi-bin/bfpropserver/bfpropserver.exe/acme.
    • A description of the site. This could be something like "The Acme Production Site" to distinguish it from a test site, for example.

  6. Click OK to quit BDE Admin.

  7. Run the BDE Console again. To get started with your Fixlet site, you'll copy an existing site and then replace certain files. Throughout this process, you should refer to the BDE Documentation for more information about creating Fixlet sites.

  8. Import site. From the Tools menu, select Import Site. Browse to the BigFix Client folder (it will be located in a path like C:\Program Files\BigFix Enterprise\Enterprise Client\__BESData\BES Support) and select the BigFix Support site. After the files are read in and verified, click Close.

  9. Copy the files. From the BigFix Support site, copy the contents of the graphics and template folders to the corresponding folders of your site.

  10. Customize your graphics. Open the Graphics folder in your site to substitute your own graphics. Double-click each graphic to edit it in your default graphics application. In particular, you will want to customize these files:
    • SiteIcol.bmp: A 64x64 pixel icon for your site. (See the BDE docs for more information about these icons.)
    • SiteIcon.bmp: The same as above, but 32x32 pixels.
    • SiteIcos.bmp: A 16x16 version.
    • title.gif: A graphic for the top of the Fixlet body.

  11. Make a sample Fixlet message. Refer to the BDE documentation for information about how to construct a Fixlet message, or copy one of the existing BigFix Support Fixlet digests and customize it.

  12. Save the Fixlet message. Select Save from the File menu.

  13. Propagate your site. Select the site and choose Propagate from the Tools menu. The propagation screen will appear. Accept the default approval settings and click Propagate. The Site Propagation Credentials dialog will appear. Browse to the folder where you stored your credentials and click OK.

  14. Add your site to the BigFix Server. Copy your masthead to the server with the BigFix Console, and double-click it to automatically add the site.

  15. Congratulations! You've created a powerful Fixlet site that you can use to issue updates to every BigFix Client on your network.